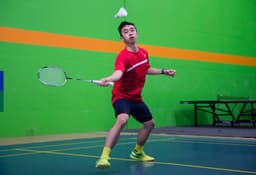
Watch a club player get stuck at the back on their backhand side and you'll see the same thing every time. Shuttle's dropping into the rear-court corner, they're a half-step late, and instead of going after it, they plant, twist their wrist into the bevel grip, and poke a weak backhand clear that barely clears the net. It's not that their backhand technique is bad. It's that a backhand was never the right shot for that ball, and nobody ever taught them the alternative.
That alternative is the round-the-head shot: a forehand played from over your head on the backhand side of the court, instead of switching to a backhand. I've spent eight years playing pro and a decade coaching adults, and this is one of the highest-leverage technical fixes I make on video, because most players don't even know it's a choice. They think the backhand corner forces a backhand. It doesn't. It forces a decision, and most club players have never been taught to make it.
This is the full breakdown. What the shot actually is and why it beats the backhand clear it's replacing, the grip, the setup and the read that has to happen before you commit, the scissor-kick footwork that gets you there, body position at contact, the swing path across the clear, smash, and drop variants, how to recover afterward, and the mistakes that turn a genuine weapon into a predictable, low-value shot.
What the round-the-head shot is, and why it beats the backhand clear 
The round-the-head shot is a forehand overhead stroke played on your backhand side of the court, your body rotating and reaching across and over your head to meet a shuttle that's dropping toward your backhand rear corner. Instead of turning your back to the net and switching to a backhand grip, you stay in forehand, jump or lunge out to the side, and hit the shuttle from a position closer to overhead than a true backhand corner would allow.
The reason this beats the backhand isn't close. A forehand overhead has your whole body behind it, shoulder rotation, hip drive, a full extended swing. A backhand from the same corner is a compact, arm-heavy motion with a fraction of the available power. Your forehand smash and drop from the round-the-head position are both real weapons. Your backhand smash and drop from the same corner mostly aren't, for most club players. You're not choosing between two versions of the same shot. You're choosing between a shot that keeps you attacking and a shot that mostly just survives the rally.
There's a recovery advantage too. A round-the-head shot finishes with your body already rotating back toward center, because that's the natural follow-through of a forehand swing. A backhand from the same corner tends to leave you twisted away from the court, with a longer path back to base. The shot that's better to hit is also the shot that's cheaper to recover from.
The grip: why you stay in forehand, not switch to backhand 
This is the detail that trips people up first. The whole value of the round-the-head shot depends on staying in your forehand grip through the entire shot. If your hand starts shifting toward a backhand or bevel grip as the shuttle drops, you've already lost the shot before you've moved your feet, because you'll either play a compromised in-between grip or bail into an actual backhand.
Keep your forehand grip loose and ready the moment you read the shuttle heading to your backhand rear corner. There's no grip change to execute here, which is part of what makes this shot faster to commit to than people expect once the footwork is trained. The hesitation isn't mechanical. It's a habit of assuming that corner means backhand, and the fix starts with simply not reaching for that grip change at all.
The setup: reading the shuttle early enough to commit 
The round-the-head shot fails most often before contact, not at contact. If you read the shuttle late, you don't have time to get into position, and you default to the backhand because it's the shot that needs the least time to execute badly.
Split-step the instant your opponent makes contact, same as every other shot. The read you're specifically looking for here is trajectory toward your backhand rear corner, and the earlier you commit to going forehand instead of turning for a backhand, the more of the footwork sequence you actually get to run. Committing late means arriving late, and arriving late to a round-the-head shot usually means arriving off-balance, which defeats the entire point of choosing it.
Footwork into position: the scissor-kick mechanics 
The scissor kick is how you get from base to the round-the-head position fast enough to hit the shot with real power instead of just reaching for it.
From your split-step, push off your racket-side leg and drive sideways and back toward your backhand rear corner. As you travel, pivot on your non-racket leg, a small jump or rotation that turns your foot and hips so you arrive sideways to the net rather than square to it, the position that lets you actually rotate into the shot instead of just poking at it. Your body should be turning through the movement, not arriving turned.
At the top of the movement, your legs scissor, one leg extending toward the shuttle as the other tucks back, which is where the drill gets its name. Land with your feet wider than shoulder width and knees bent, absorbing the landing so you're stable enough to recover immediately rather than needing a beat to reset your balance. A scissor kick that ends in a stiff, off-balance landing costs you the entire recovery advantage this shot is supposed to give you.
Body position and torso tilt at contact 
Once you're in position, what your torso does in the final instant before contact decides how much of your power actually reaches the shuttle.
Your chest should be turned toward your backhand corner, not still facing the net, hips rotated with it. This is the same principle that makes a normal forehand overhead powerful: the body coils before the arm fires, so the swing has something real behind it instead of running on arm strength alone. A round-the-head shot hit with a square torso is basically an arm swing wearing the right footwork, and it shows up on video as a shot with decent technique and no actual pace.
The tilt matters too. You're reaching up and slightly across your body, which naturally tips your torso a few degrees away from vertical. Let that happen rather than fighting to stay perfectly upright. Fighting the natural lean costs you reach and forces you to contact the shuttle lower and later than you should, which is exactly the compromised position that makes a round-the-head shot look and feel like a stretch instead of a weapon.
The swing path and contact point: clear, smash, and drop 
Once you're set, the swing itself is the same forehand overhead mechanics covered in the forehand technique guide, elbow leading, body rotation driving the first part of the power, wrist releasing last. What changes with a round-the-head shot is where you're making contact and what that costs you.
The clear. Full extension, contact as high as you can manage given the reach across your body. This is the highest-value shot in this position for most club players, because it resets the rally with real depth instead of the short, weak clears a backhand tends to produce from the same corner.
The smash. The round-the-head smash is a genuine weapon, but it demands more from your setup than the clear does, because a rushed or off-balance jump into this position turns a potential winner into a shuttle you spray wide or into the net. Only go for the smash when your footwork got you there with time and balance to spare. If you're stretched, take the clear instead and live to attack the next shuttle.
The drop. A deceptive, softer contact from the same setup, useful specifically because your opponent has to respect the smash from this position and can be caught leaning the wrong way. The drop only works as a surprise if your setup looks identical to the smash right up until the last moment, so the disguise lives in your preparation, not just your wrist.
Recovery: getting back to base after you commit 
The shot isn't finished when the shuttle leaves your strings. A round-the-head shot that scores technically and leaves you stranded out of position just handed the next rally to your opponent.
Because your body is already rotating back toward center through a proper forehand swing, the recovery step is a continuation of the motion rather than a separate movement you have to remember to make. Push off your landing leg back toward base the instant you've completed the swing, using the same rotational momentum that generated the shot's power. Players who stop to admire the shot, or who finish the swing standing flat-footed in the corner, are giving away the recovery advantage that's the whole reason this shot beats a backhand from the same position.
Common mistakes that turn this into a weak, predictable shot 
A handful of specific errors show up constantly on tape, and they're the difference between a round-the-head shot that's a real weapon and one that's just a worse backhand with extra steps.
Late commitment. Covered above, but it's the root cause of most of what follows. Decide forehand early, or you'll arrive at every subsequent step compromised.
Square torso at contact. No rotation means no power, regardless of how correct the footwork looked getting there. This is the single most common reason a technically fine-looking round-the-head shot still comes out weak.
No variation between clear, smash, and drop. If your setup always leads to the same shot, opponents stop respecting the other options and start anticipating whichever one you always play. The shot's real value comes from the threat of all three, not from any one of them in isolation.
Standing and watching after the swing. The single biggest gap between a club player's round-the-head shot and a well-coached one isn't the swing itself. It's what happens in the half-second after, and almost nobody drills that half-second on purpose.
The players who get real value out of this shot aren't the ones with the most dramatic scissor kick. They're the ones who committed early, rotated fully, varied the finish, and were already moving back to base before the shuttle landed. None of that is visible to you while you're mid-shot. It's exactly the kind of pattern that's obvious on film and invisible from the inside of your own swing.